
Suspended
(v1.0.0)Suspended captures incoming audio and plays small, overlapping pieces of it as a moving cloud of grains. Freeze a moment, shape the grains and their movement through the capture, then release back to the live signal.
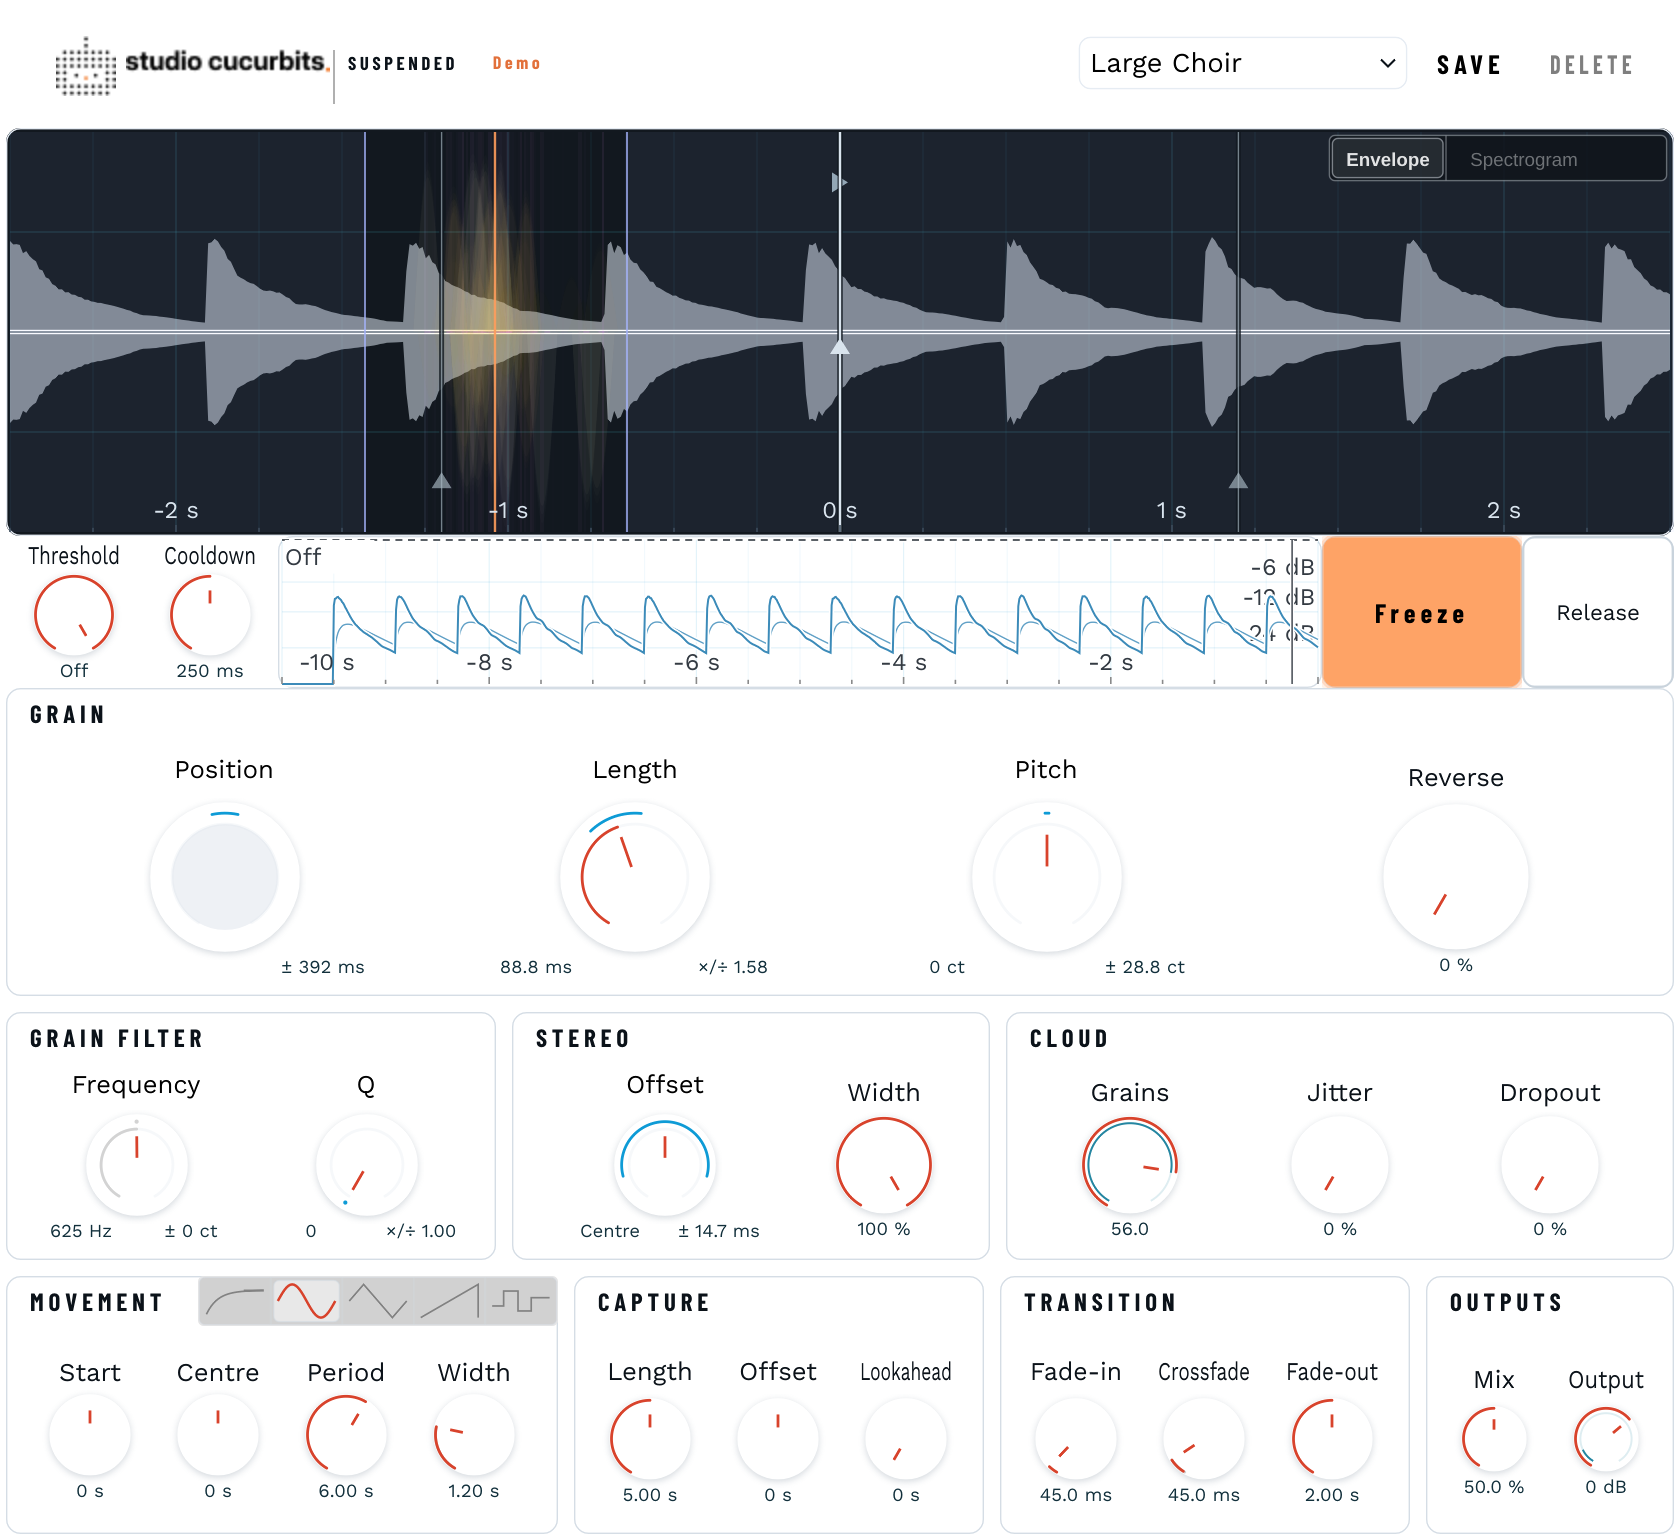
Suspended is a stereo audio effect. It continuously listens to its input and keeps up to ten seconds of recent audio. When you press Freeze, or when an input attack crosses the threshold, it takes a snapshot of that audio, the capture, and begins to play many short grains from it.
The material each grain reads is centred around a moving read pointer, with optional random displacement. You decide where the pointer starts, how it moves, and what each grain sounds like: its length, pitch, filter and stereo position. You also control how many grains overlap. Mix blends the frozen cloud with the live input, and Release fades back to the live signal.
Capture
The snapshot of input audio the grains read from. 100 ms to 10 s long.
Grain
A short, enveloped fragment of the capture. Its nominal length is adjustable from 8 ms to 2 s. Variation can produce shorter or longer grains; the available capture and playback pitch can shorten them.
Cloud
All the grains sounding together. Up to 128 grains can sound at once.
Read pointer
The position in the capture around which the material for new grains is centred. Movement controls how it travels.
Make a first capture
Section titled “Make a first capture”- Insert Suspended on an audio track and play some material into it. The lower graph shows the live input.
- Start with the default settings and set Output to a comfortable listening level. Loading a preset never changes Output.
- Press Freeze. The upper graph shows the captured material and the moving read pointer. New grains take their material from around that pointer.
- Turn Mix to balance the live input against the frozen sound.
- Press Release to fade back to the live input over the Fade-out time.
Automatic capture is off by default. Threshold starts at Off, so input attacks do not freeze automatically. Lower Threshold to enable automatic capture at a suitable input level. See Freeze, Release and automatic capture.
The interface
Section titled “The interface”The window has three areas: the header, the two graphs, and the parameter panels.
Header
Section titled “Header”The header holds the preset selector with Save and Delete. Before activation, choose the Demo badge beside the product name to open the licence panel. After activation, open it from the Studio Cucurbits logo. See Presets and Licence and activation.
Graphs
Section titled “Graphs”Captured graph
The upper graph shows the frozen capture, the read pointer, the grains currently sounding and the Movement markers. Use the switch at its top right to choose Envelope or Spectrogram. Click or drag in the graph to move the pointer (see Movement).
Live graph
The lower graph shows the input’s fast and slow attack envelopes, with the trigger threshold and Cooldown lines for automatic capture. The Threshold and Cooldown knobs sit to its left; Freeze and Release sit to its right.
Parameter panels
Section titled “Parameter panels”Below the graphs, the panels are arranged in rows:
- Grain: Position, Length, Pitch and Reverse.
- Grain Filter, Stereo and Cloud.
- Movement, Capture, Transition and Outputs.
Hover over any control to see a tooltip that explains it and gives its range.
Freeze, Release and automatic capture
Section titled “Freeze, Release and automatic capture”Freeze
Section titled “Freeze”Freeze takes a new capture and starts the grain cloud. The button stays lit while Suspended is frozen. Press Freeze again while frozen to replace the capture with the current live audio. The read pointer returns to Start when the new capture becomes active; Crossfade controls the handover from the old grains.
Release
Section titled “Release”Release ends the frozen state. The cloud thins out and fades back into the live input over the Fade-out time.
Automatic capture
Section titled “Automatic capture”Suspended can freeze by itself when the input rises sharply. Two settings control this:
Threshold
How loud an input rise must be to trigger a freeze, from −60 dB to Off (0 dB). Set it with the Threshold knob, or drag the horizontal threshold line in the live graph; both change the same setting. The top of the graph is Off; the bottom is −60 dB. Default: Off.
Cooldown
After an automatic freeze, new automatic triggers are blocked for this time (0–5 s, default 250 ms). Set it with the Cooldown knob, or drag the vertical Cooldown line in the live graph. Cooldown never delays a manual Freeze.
The live graph shows what the trigger is doing:
- A shaded amber band shows the remaining blocked time after an automatic freeze. It shrinks towards the right edge and disappears when automatic triggering is available again.
- Orange marks show accepted automatic triggers.
- Grey marks show attempts that Cooldown blocked.
Capture
Section titled “Capture”The Capture panel decides which stretch of audio a freeze takes.
Length
The length of the capture window, from 100 ms to 10 s (default 5 s). If you freeze shortly after playback starts, the part before the start is silent.
Offset
Moves the window relative to the moment of freezing. At zero the freeze point sits in the middle of the window; positive values include more audio after the freeze, negative values more audio before it. Limited to half the Length in either direction.
Lookahead
How many seconds of audio after the freeze to wait for before the cloud starts, limited to what the window includes after the freeze point. At zero, playback starts at once with the audio already recorded, and the capture keeps filling in the background.
Transition
Section titled “Transition”The Transition panel shapes how the cloud enters, how a new capture takes over, and how the cloud leaves.
Fade-in
Builds the cloud up to the full Grains count while fading from the live input into the frozen sound. 0–6 s, default 45 ms. At zero the cloud appears immediately.
Crossfade
Sets the maximum handover time when a new capture replaces a frozen one. The dial starts at 1 ms, but settings below 5 ms use a 5 ms handover. Default: 45 ms. Grains that would last longer are shortened; shorter grains finish naturally. The top setting, Off (500 ms), lets existing grains finish without shortening.
Fade-out
Thins the cloud to nothing while fading back into the live input after Release. 0–6 s, default 2 s. Long grains are shortened so they finish within the fade. At zero the live input returns immediately.
Fade-in and Fade-out crossfade by amplitude. The live signal returns throughout Fade-out. Mix sets the balance between live input and the grain cloud.
Movement
Section titled “Movement”Movement controls how the read pointer travels through the capture. Choose a mode in the Movement selector: Approach, or one of four LFO waveforms: Sine, Triangle, Saw or Random steps.
All positions are times relative to the freeze point. For example, a Start of −200 ms is 200 milliseconds before the moment of freezing.
Start
Where the pointer is placed each time a capture becomes active. Used by both modes. −5 to +5 s, default 0.
| Mode | Controls | Behaviour |
|---|---|---|
| Approach | Target, Decay | The pointer glides from Start towards Target. Decay is the time it takes to halve the remaining distance, from 0.1 s up to ∞. At ∞ the pointer stays where it is. |
| LFO | Centre, Width, Period | The pointer oscillates around Centre by ±Width. Period is the time of one full cycle, 0.1–1000 s, whatever the Width. Random steps picks a new position once per period. |
Approach and LFO keep their own settings. Target and Centre are separate values, and so are Decay and Period, so you can switch modes without losing either.
Moving the pointer by hand
Section titled “Moving the pointer by hand”Click or drag in the upper half of the captured graph to place the read pointer. Use the lower half to set Target (Approach) or Centre (LFO). You can also drag the pointer anywhere along its vertical line, or grab the Start and Target or Centre markers directly. Marker handles take priority over the pointer. Movement continues from where you placed the pointer:
- Sine and Triangle pick up from the placed position, keeping their direction of travel.
- Saw always moves forwards. If its range lies behind the pointer, it enters at the left edge of the range.
- If you place the pointer outside the LFO range, the oscillation briefly widens to include it and returns to the set Width within half a cycle.
- Random steps holds the placed position until its next step, then jumps back inside the range.
Limits set by the capture
Section titled “Limits set by the capture”A short capture may not have room for every setting. When that happens, part of the knob’s arc turns grey to show the portion that cannot take effect, and the sound uses the nearest valid value. Your setting is kept and takes effect again with a longer capture. This applies to Start, Target and Centre, Width, Capture Offset and Lookahead.
Shaping the grains
Section titled “Shaping the grains”| Control | What it does |
|---|---|
| Position | Scatters the centres of the material each grain reads around the read pointer. The value is the maximum displacement on either side, up to 5 s. The captured graph shades the area outside this range. |
| Length | The inner dial sets the grain length, 8 ms to 2 s. The outer ring sets its variation: 1× gives equal lengths; 2× allows lengths from half to twice the set value, up to 8×. |
| Pitch | Sets the mean playback pitch, from −2 to +2 octaves. The outer ring sets a bell-shaped variation spread of up to 2 octaves; individual grains can deviate by up to three times that amount. Values read in cents (ct), semitones (st) or octaves (oct): 100 ct = 1 st, 12 st = 1 oct. |
| Reverse | The chance that a grain plays backwards, 0–100 %. This is separate from the direction the pointer travels. |
| Stereo Offset | Delays one channel against the other, up to 30 ms either way; Centre means no offset. The readout shows which side leads, for example L 1.20 ms. Its outer ring varies the offset per grain. Small values are easier to reach on the dial, and values under one millisecond read in µs. |
| Stereo Width | Spreads grains across the stereo field, 0–100 %. |
| Grains | Sets the nominal average number of overlapping grains, from 1 to 128 (default 4). Variation, Dropout and the available capture can change the actual count. The dial is logarithmic: equal turns multiply the count by the same factor. A thin inner arc shows how many grains are sounding right now. |
| Jitter | Varies grain timing. At 0 % the centres of the grain envelopes follow an evenly spaced schedule; higher values randomize their timing. |
| Dropout | Randomly omits grains, creating gaps. Remaining grains are not made louder to compensate. At 100 % the cloud fades to silence. |
Playback pitch also changes how much of the source a grain covers: a grain played an octave up reads twice as much audio in the same time.
Grain Filter
Section titled “Grain Filter”The Grain Filter is a band-pass filter applied to each grain on its own, after pitch shifting. Because every grain can have its own frequency and bandwidth, the filter can scatter a sound across the spectrum.
Frequency
Centre frequency, 20 Hz to 20 kHz (default 625 Hz). The outer ring sets a bell-shaped variation spread of up to 3 octaves. Individual grains can deviate by up to three times that amount, within the filter’s frequency limits. For example, 300 Hz with a 1-octave spread allows 37.5–2400 Hz, with values concentrated near 300 Hz.
Q
Controls bandwidth relative to the centre frequency; higher values give a narrower band. 0.01 to 128. At 0 (the default) the filter is bypassed, and Frequency is greyed out. The outer ring displays a variation factor from 1× to 8×. Individual Q values can vary by up to the cube of that factor in either direction, within the filter’s limits. For example, 2× allows one-eighth to eight times the set value.
The filter has unity gain at its centre. Narrow bands remove energy, so Suspended adds up to 10 dB of make-up gain; very narrow bands can still sound quieter.
Outputs and levels
Section titled “Outputs and levels”Mix
Blends the live input with the frozen cloud, 0–100 % (default 50 %). Blending is by amplitude, so two identical signals do not get louder at the midpoint.
Output
Final level, −24 to +12 dB (default 0 dB). The minimum reads −∞ and mutes the output. A thin inner arc shows the peak output level in dBFS on the same scale.
Soft protection compresses peaks near full scale and keeps the processed output from exceeding it. When the plugin is bypassed in the host, the input passes through unchanged.
Dense clouds are level-calibrated, so adding grains thickens the sound without a large jump in level.
Working with the controls
Section titled “Working with the controls”Paired knobs
Section titled “Paired knobs”Length, Pitch, Stereo Offset, Filter Frequency and Q are paired knobs. The inner dial sets the value; the outer ring sets how much it varies from grain to grain. Press on the ring you want and drag. Crossing the other ring during a drag does not switch controls.
On a paired knob, the red arc shows the value and a cyan segment around its tip shows the range of variation. Position has only a variation ring; its centre dial is inactive.
Typing a value
Section titled “Typing a value”Click any value readout to type a number in the unit shown beside the field. Press Return or click elsewhere to confirm; press Escape to cancel. Turn Decay fully up for ∞.
Readouts
Section titled “Readouts”- Times read in ms below one second and in s above; Stereo Offset uses µs below one millisecond.
- Filter Frequency reads in kHz from 1000 Hz.
- Start, Pitch and Stereo Offset are centred knobs: their neutral positions are 0 s, 0 ct and Centre.
- Percentages are used for fractions such as Reverse, Jitter and Mix.
Reading the display
Section titled “Reading the display”Envelope and Spectrogram
Section titled “Envelope and Spectrogram”The switch at the top right of the captured graph chooses Envelope or Spectrogram. In Spectrogram view, a small button inside the switch cycles the frequency scale:
lin
Linear frequency, short analysis window.
log
Logarithmic frequency with a long window, for more detail in the low range.
cqt
Constant-Q, twelve bands per octave from 20 Hz, with longer windows for lower frequencies.
Brighter colour means stronger content. These display settings leave the sound unchanged. The frequency scale is saved with the session; the Envelope/Spectrogram choice lasts while the plugin instance is open.
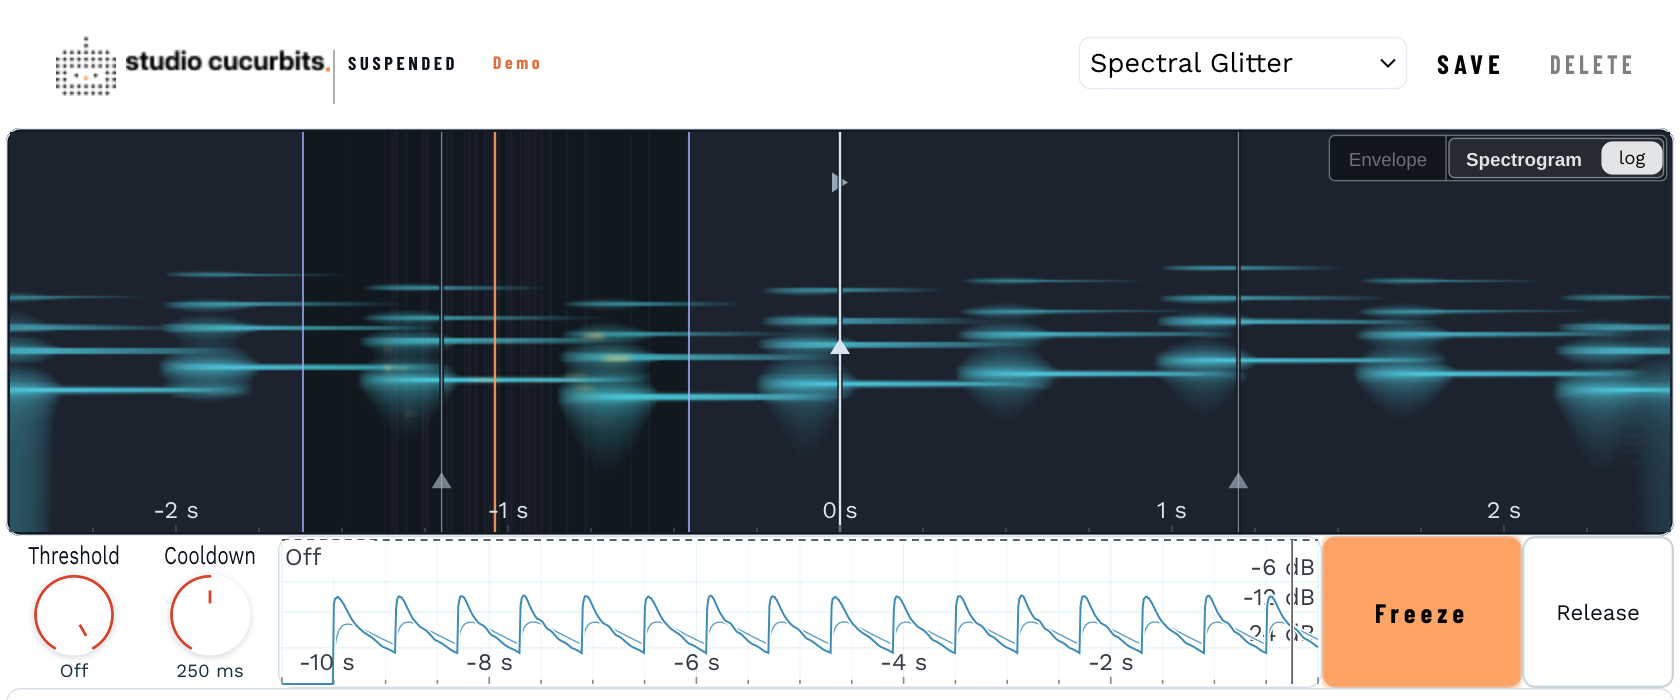
What the colours mean
Section titled “What the colours mean”- Orange line: the cloud's read pointer.
- Pink lines: the current read positions of individual grains.
- Yellow windows: the grains currently sounding. In Spectrogram view they tint the frequencies each grain plays.
- Cyan tint and edges: the Position range around the pointer.
Presets
Section titled “Presets”Presets recall selected parameters. A movement-only preset changes the pointer’s movement while keeping the grain, filter, stereo and cloud settings. A grain-only preset keeps the movement settings.
Factory presets
Section titled “Factory presets”The factory list has two sections. Choosing a Grain preset changes the grain, filter, stereo and cloud settings and keeps Movement, Capture, Transition, Mix and Output. Choosing a Movement preset changes only movement.
| Chaos | Dense, irregular grains with broad pitch and filter variation. |
|---|---|
| Dark Drone 1 | Long grains pitched two octaves down with varied low-frequency filtering. |
| Dark Drone 2 | Shorter grains pitched an octave down through a broad low-frequency filter. |
| Drill | A dense, regular grain stream with a small upward pitch shift. |
| Large Choir | Many short grains with subtle pitch variation and a wide stereo spread. |
| Long Note | Long, overlapping grains with occasional reversed playback. |
| Musical Notes | Pitch variation and narrow, varied filter bands create a scattered tonal cloud. |
| Spectral Glitter | Short grains through narrow filter bands with wide frequency variation. |
| Strange Harmonies | Long grains with pitch variation and widely scattered low-frequency filters. |
| Constant Movement | Slow triangular movement around a saved centre. |
|---|---|
| Freeze | Keeps the read pointer stationary (infinite Decay). A new capture still places it at Start. |
| Random Bits | Random steps through the capture with a short period. |
| Real Time | Saw movement with a five-second period. |
| Slow Motion | Approaches a saved target with a long decay. |
Factory presets by Frederik Bous.
Saving a preset
Section titled “Saving a preset”- Choose Save and enter a name.
- Tick the parameters the preset should recall. Expand a group to choose individual parameters; a group tick selects or clears all of its children, and a dash means only some are selected. On paired controls, Value and Variation can be chosen separately.
- Confirm. Saving does not change the current sound. Cancel keeps both the sound and the previous preset selection.
The Save dialogue starts with the current preset’s parameter selection. Tick or clear groups to choose what the new preset should recall. Only the active movement settings can be included: Target and Decay for Approach; Centre, Waveform, Period and Width for LFO; Start for both.
Output, Bypass, Freeze and Release are never stored in presets. Saving under a name that already exists creates a separate preset, such as “Grain (2)”, and keeps the earlier one.
Presets that include grain, filter, stereo or cloud settings appear under User Grain. Presets with movement settings and none of those sound settings appear under User Movement, even if they also include Capture or Transition. All other presets appear under User Grain.
Loading a preset
Section titled “Loading a preset”Loading recalls only the parameters the preset includes; everything else keeps its current value. An asterisk (*) beside the preset name means you have changed a parameter the preset includes. Undoing the change removes the asterisk.
Sessions and automation
Section titled “Sessions and automation”Your host session stores parameter settings and the spectrogram’s frequency scale. Captured audio and a pointer placed by hand are not stored; a new plugin instance opens in Envelope view. After reopening a session, freeze again, or render the result to an audio track if you need that exact sound.
All parameters can be automated. Automation lanes are named after the controls; paired knobs have separate Value and Variation lanes. Movement mode and LFO shape are separate lanes behind the combined Movement selector.
The parameter reference lists every full automation identifier, including separate value and variation lanes.
Licence and activation
Section titled “Licence and activation”Without a licence, Suspended runs in demo mode: it mutes its output for about five seconds after every five minutes of processed audio. Activation needs an internet connection; offline activation is not available in this release.
Activate
Section titled “Activate”- Open the licence panel: choose Demo in the header. After activation, use the Studio Cucurbits logo.
- Enter your 43-character Activation code and choose Continue.
- Check the computer name. It starts with this computer’s host name, or the name you used last time; change it to anything that helps you recognize this computer.
- Choose Activate, then close the panel. You do not need to restart the host or reinstall.
Back keeps your code while you move between steps. Buy opens the Suspended product page. If the connection fails, choose Try again; if the code is rejected, choose Edit code or Edit details.
When all seats are in use
Section titled “When all seats are in use”Choose a computer to replace, and review whether to replace this product only or all products on that account. The replaced products become inactive on the old computer after its next successful licence check. There is no separate Deactivate button.
A different account on this computer
Section titled “A different account on this computer”If this computer is already licensed to another account, you can keep the accounts separate or link them to share licences. Linking needs the other account’s code and your confirmation of an account preview. If you close, decline or wait more than five minutes, the new code is discarded and the activation you completed stays in place.
Recover a lost code
Section titled “Recover a lost code”Choose Recover code and confirm your email address; the address from the last activation is filled in for you. Follow the emailed link to receive a new activation code.
Checking your licence
Section titled “Checking your licence”After activation the Demo badge disappears; open the panel from the Studio Cucurbits logo. The panel lists your licensed products and seat counts, and which products are active on this computer. Refresh checks your licence details immediately. Suspended also checks periodically in the background. A failed connection never expires a licence that is already installed.
Parameter reference
Section titled “Parameter reference”Ranges below are the complete host parameter ranges. The usable range of some controls also depends on the current capture; see Limits set by the capture. Paired controls share a visible caption and have separate automation lanes.
| Control | Automation identifier | Range / choices | Default |
|---|---|---|---|
| Grain · Position Position Variation | suspended.grain.position.var | 0 s – 5.00 s | 0 s |
| Grain · Length Length Value | suspended.grain.length.val | 8.00 ms – 2.00 s | 180 ms |
| Grain · Length Length Variation | suspended.grain.length.var | 1.00 x – 8.00 x | 1.00 x |
| Grain · Pitch Pitch Value | suspended.grain.pitch.val | -2.00 oct – 2.00 oct | 0 ct |
| Grain · Pitch Pitch Variation | suspended.grain.pitch.var | 0 ct – 2.00 oct | 0 ct |
| Grain · Reverse Reverse | suspended.grain.reverse | 0.0 % – 100.0 % | 0.0 % |
| Grain Filter · Frequency Frequency Value | suspended.filter.frequency.val | 20.0 Hz – 20.0 kHz | 625 Hz |
| Grain Filter · Frequency Frequency Variation | suspended.filter.frequency.var | 0 ct – 3.00 oct | 0 ct |
| Grain Filter · Q Q Value | suspended.filter.q.val | 0 – 128 | 0 |
| Grain Filter · Q Q Variation | suspended.filter.q.var | 1.00 x – 8.00 x | 1.00 x |
| Stereo · Offset Offset Value | suspended.stereo.offset.val | L 30.0 ms – R 30.0 ms | Centre |
| Stereo · Offset Offset Variation | suspended.stereo.offset.var | 0 ms – 30.0 ms | 0 ms |
| Stereo · Width Width | suspended.stereo.width | 0.0 % – 100.0 % | 0.0 % |
| Cloud · Grains Grains | suspended.cloud.grains | 1.00 – 128.00 | 4.00 |
| Cloud · Jitter Jitter | suspended.cloud.jitter | 0.0 % – 100.0 % | 0.0 % |
| Cloud · Dropout Dropout | suspended.cloud.dropout | 0.0 % – 100.0 % | 0.0 % |
| Capture · Length Capture Length | suspended.capture.length | 100 ms – 10.0 s | 5.00 s |
| Capture · Offset Capture Offset | suspended.capture.offset | -5.00 s – 5.00 s | 0 s |
| Capture · Lookahead Capture Lookahead | suspended.capture.lookahead | 0 s – 10.0 s | 0 s |
| Attack · Threshold Attack Threshold | suspended.attack.threshold | -60.0 dB – Off | -42.0 dB |
| Attack · Cooldown Cooldown | suspended.attack.cooldown | 0 s – 5.00 s | 250 ms |
| Transition · Crossfade Crossfade | suspended.transition.crossfade | 1.00 ms – Off | 45.0 ms |
| Transition · Fade-in Fade-in | suspended.transition.fade-in | 0 s – 6.00 s | 45.0 ms |
| Transition · Fade-out Fade-out | suspended.transition.fade-out | 0 s – 6.00 s | 2.00 s |
| Freeze Freeze | suspended.freeze | Off – On | Off |
| Release Release | suspended.release | Off – On | Off |
| Movement · Mode Movement | suspended.movement.mode | Approach / LFO | Approach |
| Movement · Start Start | suspended.movement.start | -5.00 s – 5.00 s | 0 s |
| Movement · Target Target | suspended.movement.target | -5.00 s – 5.00 s | 0 s |
| Movement · Centre Centre | suspended.movement.centre | -5.00 s – 5.00 s | 0 s |
| Movement · Decay Decay | suspended.movement.decay | 100 ms – ∞ | 1.00 s |
| Movement · Shape Shape | suspended.movement.shape | Sine / Triangle / Saw / Random steps | Sine |
| Movement · Width Width | suspended.movement.width | 0 s – 5.00 s | 0 s |
| Movement · Period Period | suspended.movement.period | 100 ms – 1000 s | 1.00 s |
| Mix Mix | common.mix | 0.0 % – 100.0 % | 50.0 % |
| Bypass Bypass | common.bypass | Off – On | Off |
| Output Output | common.output | -∞ – 12.00 dB | 0.00 dB |
Troubleshooting
Section titled “Troubleshooting”Suspended freezes when I don’t want it to.
Automatic capture is on. Turn Threshold fully up to Off, or raise it so only strong attacks trigger, and lengthen Cooldown to space out triggers.
I pressed Freeze but hear little change.
Check Mix: at 0 % you hear only the live input. Also check Dropout (100 % silences the cloud) and Lookahead, which delays the start of the cloud.
The cloud is silent or thin after reopening a project.
Captured audio is not saved with the session. Press Freeze again, or render the sound to audio before closing.
Part of a knob’s arc is grey.
The capture is too short for the full setting. The sound uses the nearest valid value; lengthen Capture Length to use the rest.
Frequency and its variation are greyed out.
Filter Q is 0, which bypasses the Grain Filter. Raise Q to turn the filter on.
The output drops out for a few seconds every few minutes.
Suspended is running in demo mode. Activate a licence in the licence panel.